
Producer : “How long will it take?”
Editor : “I don’t know … how much time do I have?”
There really isn’t ever enough time in edit these days … and when you want or need to quickly blur something out, sharpen something up, mask a car license plate or the telephone number on a legal document, or perform any number of those little region specific tasks that seem to bite us on every edit job, well messing about with duplicating and masking layers in order to do just that can be a real pain in the butt. It’s not the wrong thing to do, it’s just time consuming and awkward, and depending on your skill level, it’s often unnecessarily difficult.
Andy’s Region Tool can’t help in every situation, but it does try to offer a hopefully useful subset of common tools which you can quickly apply to a region of your choosing. Originally a popular FCP only effect called Andy’s Region Blur, it was quickly expanded to offer additional primary effects (Mosaic and Smudge) and controls for optional tinting and desaturation. Now, in FxFactory, Andy’s Region Tool has been further expanded to offer even more primary effect options, including Sharpening and basic Noise Reduction and Cloning, plus extra image controls for Saturation, Brightness and Contrast … and for those tricky jobs that need it (or just for the creative possibilities) it allows a separate complementary set of adjustments to be applied to the outer area of the defined region.
The Controls.
.
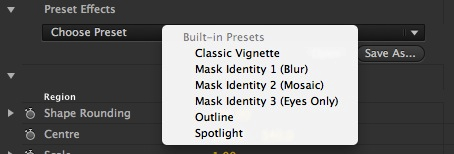
First up are the Preset Effects : A handy quick start launching point for setting up the controls appropriately for a variety of basic tasks … and for saving your own special settings recipes. We’ll have a quick look at these later.
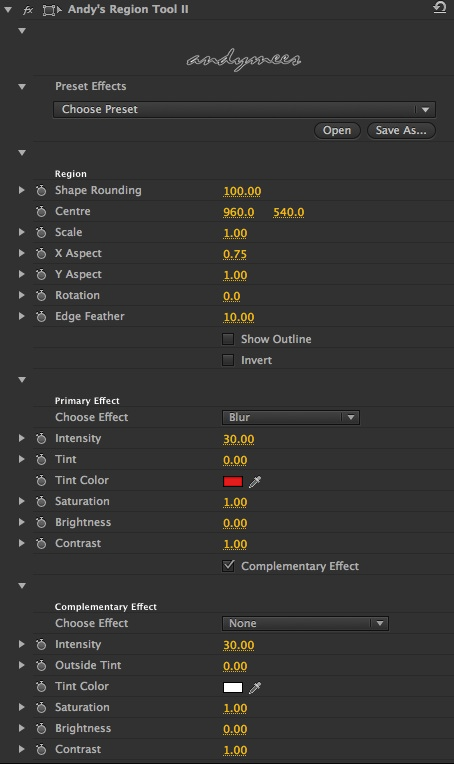
Next up are the Region controls. Not surprisingly, this is where you find the controls for targeting the specific area you want to adjust.
Shape Source: Use this to choose your shape source … Basic, Image Well or Load from File.
Shape Rounding: (Shape Source: Basic) At it’s minimum value of “0” the shape is a simple square. As this value is increased the corners of the square become more and more rounded. At it’s maximum value of “100” the shape is now a circle. Clever stuff.
Image Well: (Shape Source: Image Well) Drag and drop the Black and White or Greyscale image here that defines your custom shape.
Load Shape Source: (Shape Source: Load from File) Use to select the Black and White or Greyscale image here that defines your custom shape.
Centre: Use this to define the centre point of the target region. An on screen centre control can be enabled / disabled by toggling the Transform icon just to the left of the effect name.
Scale: Use this to adjust the overall size of the target region.
X Aspect and Y Aspect: Use these to compress or expand the region on a single axis, to turn your square into a rectangle, or your circle into an oval.
Rotation: You guessed it, this one is for rotating the region around it’s center point.
Edge Feather: This control sets the softness of the region edge, and hence how smoothly the inner region and outer region portions of the image are blended together.
Show Outline: Enabling this control will draw a tinted outline around the boundary of the defined region. If the region is feathered then enabling this option will cause the feathered area of the image to become tinted, producing a halo like outline effect. Tip: This is a really useful option for helping target the exact region you want to isolate. Enable it when you need to more precisely target a region, then disable it again before you render out your completed effect.
Invert: Enabling this control switches the targeted effect area from inside the defined region to outside the defined region.
Next come the Primary Effect controls. This is where you’ll select and control the specific effect you want to apply to the targeted region and/or any secondary image adjustments you wish to add to that same region. The available effects in the Choose Effect popup are:
Blur … a basic Gaussian Blur.
Mosaic … a pixelization effect that aggregates source pixel colors to make your image “blocky”.
Crystalize … an alternative pixelization effect that uses polygon-shaped color blocks.
Posterize … reduces the available color palette to produce a silk screened poster type effect.
Reduce Noise … averages pixels to produce a very fine noise reducing blur.
Sharpen … increases image detail by sharpening luminance and chrominance of pixels.
Sharpen Luminance … sharpening that operates only the luminance of the image pixels.
Unsharp Mask … increases edge contrast between pixels of different colors.
Alpha … a “cut-out” option to simply set the transparency of the target region.
and Clone … to fill the region with an alternative portion of the source image.
Intensity: Use this to increase or decrease the intensity of the selected effect. (Not applicable to the Reduce Noise effect).
Tint: Use this to opacity control to apply a tint to your selected region. This can be great for creating a vignette or spotlight effect.
Saturation: Use this to increase or decrease the color saturation within your selected region. A little desaturation can add a nice classic touch to a simple vignette.
Brightness and Contrast: Use these controls to increase or decrease the brightness and contrast within your selected region.
And finally, there’s the Complementary Effect toggle. I’d tend to consider this an advanced control as most of the time you would not want to enable this. However, as and when the need arises, you can use this to control to enable and disable the ability to add an extra and separate primary effect and/or image adjustments to the outside (complement) of your targeted region.
So that’s pretty much it, jump on in. Everything is keyframable if needs be … mostly I find myself keyframing the centre control. A good tip for Premiere users is to enable an on-screen centre control by clicking the “Transform” icon just to the left of the effect’s name … that’s what allows you to simply click and drag in the Program Monitor to place / move the region centre.
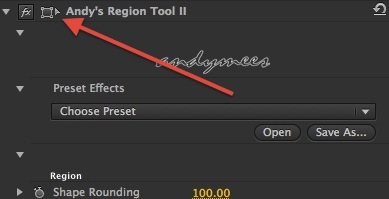
Yep, that’s the transform icon, right there.
Preset Effects
As noted above, I’ve included a few quick presets, for what are (for me) commonly needed settings. I hope these might provide you with a useful launch point to create and save your own presets.
We’ll have a look at some example uses of these presets in Final Cut Pro 7 below, with each preset massaged for a specific use in the selected shot. Note that all these presets were created for a 1920×1080 frame size. If you are using a larger or smaller target frame size then you may need to adjust the Region’s Scale and/or Aspect parameters accordingly for similar results.
Classic Vignette

The “Classic Vignette” preset sets up a large horizontal oval region with a nice soft edge, inverted (so as to effect the outside rather than the inside of the region). That outside region area is then lightly blurred, slightly desaturated, and darkened with a 70% black tint. In the screenshot above I’m using a FCP’s Frame Viewer view so you can see a before (left side) and after (right side) comparison.
Mask Identity 1 (Blur)

The Mask Identity 1 (Blur) preset defines up a small blurred oval region that you might commonly use to obscure a face. Depending on your source you’ll need to scale, centre and rotate it as needed. In the example shown above I’ve also used the “Tint Color” eyedropper to sample the skin tone and then added a mild tint to the blurred region using that color.
Mask Identity 2 (Mosaic)
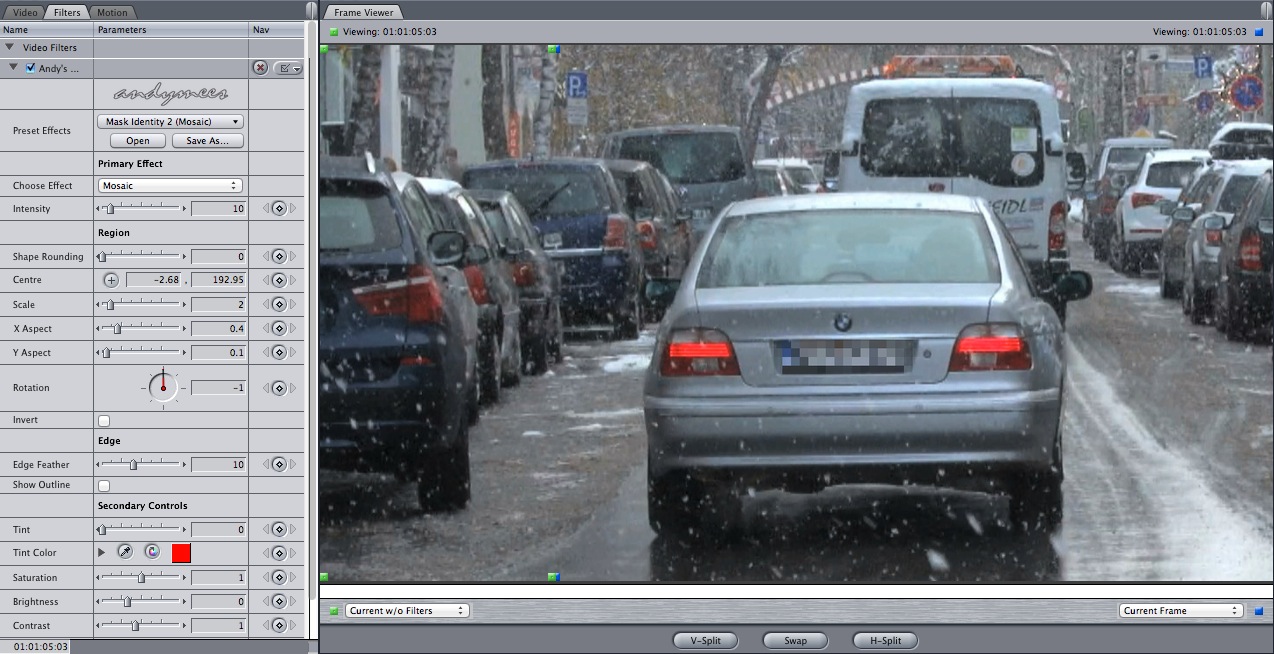
The Mask Identity 2 (Mosaic) preset is a simple copy of the preceding Blur effect, but uses a Mosaic filter as the Primary Effect. In the example above I have modified the region using the Shape Rounding control, using a setting of “0” to create a basic square shape, then adjusted the Centre, Scale, X and Y Aspect parameters and the Rotation control, to effectively shrink and shape the region to mask the license plate of the vehicle in the center of the frame.
Mask Identity 3 (Eyes Only)

The Mask Identity 3 (Eyes Only) preset creates an entirely black rectangular region courtesy of nothing but the “Tint” and “Tint Color” controls. When all you need to do is obscure a subject’s eyes then this is a quick and simple option thats always available. The Primary Effect is set to “None” and the “Tint” is set to “1”, making the area a fully opaque block color of your choice.
Outline
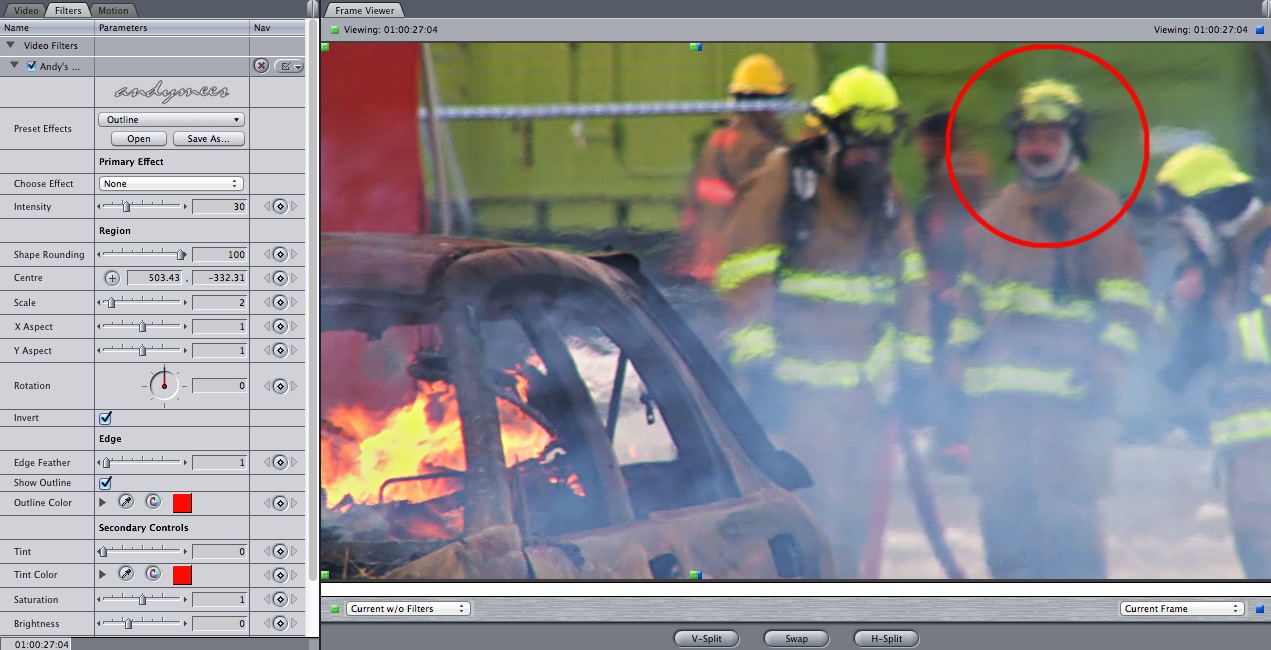
The Outline preset as shown above is great for overtly concentrating the viewer’s attention on a specific object or subject within the frame, without obscuring other elements within the image. At it’s default setting the region created is a circle, and the Primary Effect is set to “None” as no other effect need be applied (although a light blurring of the outside region can sometimes enhance the effect). The “Show Outline” control is enabled, which in turn causes the display of a “Outline Color” control. In the example above I’m using the default outline color, and have centered the circle region on a specific fire-fighter. Note that a slight Edge Feather has been used to reduce unwanted aliasing at the edge of the region … it can also be used to lightly increase the outline width, although too much feathering will cause the outline to take on more of a halo like effect (which is great if that’s what you’re looking for). Also note that the region is “Inverted”. When using the outline control, you may see a fringing at the edges of your image … using the “Invert” option can prevent this.
Spotlight

The Spotlight preset is very much like the preceding Outline preset. It’s designed specifically for highlighting a specific object or subject in the frame, but of course, this effect intentionally obscures other portions of the frame. Again the Primary Effect is set to “None”, the region is defined as a basic circle (ie Shape Rounding is set to “100” and both X and Y Aspect controls are set to “1”). The Tint Color is set to a flat Black and the Tint value is set high, at around 80% opaque. A very light Edge Feather value is used to reduce aliasing at the otherwise sharp region edge.
Selective Sharpen

Ok, so this one isn’t a built in preset, but I wanted to include it as a further example of real world use of Andy’s Region Tool, and the kind of preset you might like to create for yourself.
I work with some pretty excellent camera guys and gals, and that means the quality of the footage I get to work with is top notch … but no one is fallible right, the cameraman can have an off day and just ever so slightly lose focus on a shot you just can’t do without … a camera might develop technical problems when a reshoot just isn’t feasible … or heaven forbid, sometimes you just get stuck with pictures from the freelance cameraman from hell. Selective sharpening can be a godsend in those situations.
In the above example, due to the wonders of large sensor video camera’s (and the consequent excessive use of shallow depth of field by over eager would be DOP’s) I have a shot where the eyelashes and eyebrows of my extreme close up seem to be the area of prime focus rather than the iris itself. There’s simply no way to perfectly restore the shot, but what I can do is use a round mask shape to isolate just the iris (hint: use the “Show Outline control to help you target your region, but don’t forget to turn it off again!) … I can then use the Sharpen Luminance effect to add a little edge detail into the otherwise blurred region. I can even add a touch of additional saturation and contrast to that area to really make the iris stand out. And if wanted, I can also enable the “Complementary Effect” controls and use the “Reduce Noise” filter to add a very fine grain pixel averaging blur to all image detail outside that iris area. The overall effect may not be a perfect recovery job, but I like to think it does rescue the shot enough to make it usable. I’m a practical kind of guy, and that’s all I’m really after.
Well that’s it for now I think. Your best bet is to throw it on a shot and have a play. Hopefully you’ll find it all makes sense.
I will say that I’m not especially happy with the performance of the plugin in Adobe Premiere Pro as yet. That may be down to my use of an underpowered test machine, but even so, I’m looking to see what improvements if any I can make to ensure performance is optimized for all platforms.
In the meantime tho, enjoy. I hope you find it useful.
All the best
Andy.

Thanks for this. I haven’t moved to FCP X yet but when it was released, my first observation was “where’s the blur tool like Andy’s Region Blur?” ARB in FCP has saved me hours and hours, just in a couple of projects. At first it was just a product label here and there, but the first time I had to blur dozens of faces in a busy health facility video (seriously people, if you don’t want to be in the video, stop moving towards the damn camera and staring straight at it) I looked to the heavens and gave a silent thanks for ARB. When I do move to FCP X, this will be the first plug-in I grab.
How ca I download the plugin? The button doesn’t work…
tnks!
.e.
Hey Enzo,
Sorry about that. Please can you try the button again? I’ve re-edited the link. Should be more reliable now.
If you find it’s still not working at your end then feel free to jump directly to the Noise Industries “freebies” download page here : http://www.noiseindustries.com/fxfactory/free/
Thanks
Andy
I seem to have an issue in Premiere where I lose the renders of a clip with the Region tool effect applied. While working on the edit it works fine…when I close the project and re-open the next day the renders on this clips are gone. Any suggestions? Thanks in advance! Love the plug-ins by the way!
Well that’s pretty odd … I’d be tempted to suspect Premiere’s render management, but if it’s only ever happening with Region Blur then there ought to be a reason … either way, let me see if I can replicate the problem here.
Thanks for the heads up
Andy
Hi Jay, so I understand that there are indeed apparent render management issues in Premiere that FxFactory 4.0.6 is exposing. There’s nothing I can do as an FxFactory plugin developer to remedy this, but the Noise Industries folks are aware of the issue, so I’d expect a fix in due course. Apologies for the inconvenience … normal service will be resumed shortly … or something like that. 🙂
Cheers
Andy
Andy,
Thanks for looking into this for me. Glad to hear that FXFactory is aware of the issue and hopefully there will be a fix in the near future.
Thanks again for the Plug-ins!
Jay Cederholm Editor jay@plummovingmedia.com 414-271-6650
Thanks for getting back to me. I also have an issue where I render a clip, copy and paste the same clip to later in the timeline and then have to render the clip in the new location again. I have my sequence set up as 1280×720, ProRes (video previews)
Andy,
Thanks for looking into this for me. Glad to hear that FXFactory is aware of the issue and hopefully there will be a fix in the near future.
Thanks again for the Plug-ins!
Hi,
Thanks for the free and useful plug-in. I am disappointed though, as it seems that whenever I apply the region tool to a clip, not only do I get the desired effect inside the region I selected, but the outside also gets slightly blurred and loses sharpness. Is this a bug or am I doing something wrong ? This is happening on FCP X 10.0.9 on a 720p timeline.
Thanks anyway for making this available !
Hi Boris
Yes, I’ve just received a report of exactly the same problem from a user working with PAL IMX 50 footage … and yes, it is disappointing.
At the moment I’ve only had time to do some very limited investigation of the problem and so far its looking a little like it might be a problem specific to FCP X.
Best I can suggest at the moment is that you don’t use it in FCP X.
Sorry
Andy
Hi Andy,
thanks for the quick reply. I found a workaround using a mask tool + a blur effect, which does the trick for me. Please feel free to contact me if you need more input from me in order to find out what’s going on, I’d be happy to help. I could send you a test file from my footage if needed.
Thanks again,
Boris
Hey there Andy – thanks very much for the download… I’m running Adobe Premier Pro CC – can you advise how i install? Extension manager doesn’t seem to work. Thank you!
Hi Andy,
great tools, really. But I have a problem: I’m running FCX 10.1.3 and I’d like to apply the alpha effect on a rectangular region of the video, but I can find the Shape Rounding setting in the 1.2 version of the plugin. Is it just me missing something, or did you change the plugin from the one in the tutorial? Can you help me?
Thank you in advance.
Cristina
Hi Andy,
I downloaded your effect through fxfactory to use on a project I’m trying to complete only with motion and FCP X. The effect is showing up and working fine in Premiere Pro and After Effects but not FCP X and Motion. Do you have any troubleshooting tips that might help me fix this? Thanks!
The image well doesn’t appear to be working for me. I change the setting to image well and apply a black and white still to act as my mask, what am I doing wrong? I am on Yosimite, and fcpx 10.1.4. Can’t upgrade to 10.2 until this project is complete.
Oh, no Windows version! 😦 Sad
Is there a way to run it outside of FxFactory, on Windows? Looks like a very helpful plugin
Hi Andy…love your plug-ins and use them regularly. I am currently having issues with the Region Tool in my FCPX 10.2.2 project (sequence.) To be fair this project has become quite large/complex compared to other FXCP projects in the past. While the plug in worked originally it seems to no longer function. In the video tab the effect is reading but only the pop up tab and image well are showing…no other parameters…and the effect is not working. I can include a screen shot if yo would like…not sure where I would include this. Thanks so much in advance.
Jay
Just to follow up…it turns out that the other plugins are not working either…Andy’s Safe Guides, etc. although they work on my co-workers computer. I reset my preferences, checked permissions with no luck.
Thank you, Andy. Sorry for the naive question, but I am pretty new to Pr word: how can I install it? I have a Microsoft 10 and a PR Pro. Thanks
Hey gd
Sorry, but these are FxFactory based plug-ins… and unfortunately FxFactory only runs on Mac OS X systems.
Cheers
Andy