
Originally released in March 2008, these FxFactory based plugins are recreations of the old Andy’s Elastic Aspect plugin for Final Cut Pro (Legacy).
Although the much lamented FCP of old has since passed into history, through the magic of FxFactory you can still enjoy many of your favourite old effects in all your fancy modern FxFactory supported hosts … and now Andy’s Elastic Aspect plugin is proud to join the fray.
In this release you’ll find three versions : Classic, Simple and Max. What are they for? Well the basic premise that I wrote back in 2008 hasn’t really changed …
“Your big ass widescreen TV at home has a progressive stretch mode that you can switch on when you’re watching normal 4:3 broadcasts … it makes the picture fill that gloriously wide screen without everything seeming too obviously stretched. So how does that work? It uses a proprietary pixel stretching algorithm to leave the center of the screen relatively undistorted whilst stretching the pixels more and more the nearer they approach the edge of the screen. OK, so how does this plug-in work? Errrm … pretty much the same way …”
“The basic prerequisite for using this effect properly is first to tell your NLE to stretch your otherwise 4:3 clip to fill your 16:9 sequence.”
“Why?” you ask, have I suddenly re-worked and re-released this plugin now? You can go ahead and thank (or blame) GoPro. It turns out that their awesome little camera shoots some of it’s very best images in 4:3 mode … and they and their customers have been some of the most active users of Andy’s Elastic Aspect. Well I happen to think GoPro camera’s are pretty awesome, so when FxFactory hit version 4.0 and introduced host support for Adobe Premiere Pro, I decided it was finally time to check out the developer side of the FxFactory plugin system … I’m glad I did.
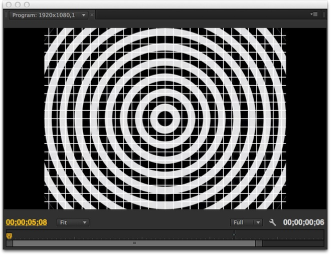
Using a 4:3 clip within a 16:9 edit in Premiere Pro

Pictured above is a 4:3 source clip that I’ve added to my 1920 x1080 Premiere Pro project. The dimensions of source footage in this case is 640 x 480, and it has a native pixel aspect ratio of 1.0. So it’s too small and its the wrong shape!
In order to prepare this clip for best use with my Elastic Aspect plugin in Premiere Pro there are two steps that I’ll need to take …
1) Scale to Frame Size
I need to scale my source footage appropriately for my target sequence frame size , as above … select your clip, then go to the Clip menu > Video Options and choose Scale to Frame Size
It may be worth noting that this is a default behaviour option in Premiere Pro … under Preferences > General tab, if you just tick the Default scale to frame size option, then Scale to Frame Size will be pre-enabled on all clips.
2) Modify the clip for anamorphic display

I need to tell Premiere to treat the footage as if it is “Anamorphic” … select your clip, then go to the Clip menu > Modify > Interpret Footage… and set the Pixel Aspect Ratio >> Conform To: property to HD Anamorphic 1080 (1.333)

And there we go, our clip has now been accurately scaled and stretched to fill the frame and is ready for a bit of Elastic Aspect manipulation … so lets grab “Elastic Aspect Classic” from the Effects >> Video Effects >> Andy’s Effects folder and throw it on our newly prepped clip.
Elastic Aspect Classic – Effect Controls


Right off the bat you’re going to see a default correction applied. A narrow center region of the image has been corrected to display in it’s original 4:3 aspect ratio, whilst the areas of the image lying outside of that protected region are gradually stretched to fill the remainder of the 16:9 frame.
Lets take a look at the effect’s controls, and the default settings that produce the above effect.
There are a number of pretty self-explanatory sliders, all of which help to define the display of what I call the “region of protection” ie the area of the image within which the pixel aspect is most fully corrected to display in it’s original aspect.
“Protection Centre” is a slider that varies from -1 to +1 … give it a wiggle and you’ll see that it controls the placement of the region of protection, left (-1) to right (+1).
“Protection Width ” is a slider that varies from 1 to 99 … as it’s name implies, this slider controls the width of the region of protection and is a percentage of the original image width.
“Protection Override” is a slider that varies from 0 to 1 … this control can be used to add a little bit of linear stretch back into the otherwise protected area of the image. A little bit of stretch will likely go unnoticed and will help greatly in reducing any apparent disparity of distortion.
“Elasticity” is a slider that varies from 0 to 1 … as you might guess, this control determines just how “stretchy” you make the image, it’s effect is most apparent at the outermost edges of the image. With a value of “0” the elasticity of the image is at it’s least, producing a more linear stretch between the region of protection and the image edge. With a value of “1” the elasticity of the image is at it’s greatest, resulting in a more exaggerated difference in distortion between the region of protection and the image’s outermost edge.
“Tension Tweak” is as slider that varies from -0.20 to +0.20 … this is a new control and is designed to better allow some adjustment in the delicate zone between the region of protection and the region of elasticity. Whistle the plugin is designed to automatically provide a naturally smooth graduation between these areas, on occasions where more dramatic distortions are attempted, this parameter should allow the user better control of that delicate balance.
“Show Protected Region” is a simple on/off switch … to enable / disable the display of an on screen guide to help you better define your region of protection / region of elasticity, and you almost certainly want to remember to switch it off before you render!
So there you go. If you’ve ever used the old Andy’s Elastic Aspect plugin then you should find this new version will be be pretty familiar and hopefully it’ll feel right at home in your effects bin. And if you’re new to the plugin, well then “Welcome!”. Load it up and have a play, it’s all pretty straight forward.
Elastic Aspect Simple

Elastic Aspect Simple is as it’s name suggests … a very much simplified version of the effect, with just two controls, and for most folks this is likely the quickest and easiest version to use :
“Center” provides the same fundamental control as found in Elastic Aspect Classic, that allows you to target the area of the image within which you want the greatest protection / aspect correction.
And “Override” provides a simple control that allows you to increase or decrease the intensity of aspect correction applied to the image.
Elastic Aspect Max

Elastic Aspect Max takes the “Simple” idea two or three steps further … how can I put it … its a very much more complicated version of the simplified version of the effect. 🙂
Open it up and have a play. Consider it a working yet experimental version. It lacks the precise control of the segmented zone version that is “Classic” but at the same time the simplicity of the “Protection Presets” style of controls might be to your liking.
With it there is the default one size fits all setting, plus you are able to choose from a selection of built in presets that offer alternative varying protection zone widths. You have full access to all the controls that I used to create these presets, and you can tweak these and/or create and save your own presets as needed.
• Try loading the “Extra Small” preset then adjust the “Elasticity” control … as you raise it from 0 to 33 you should see this effectively increases the elasticity of the centre protection region, essentially working as a “protection override”.
• Try loading the Extra Large” preset then adjust the “Mod 1” control … as you back it down from 100 to 33 you should see that this progressively narrows the protected area.
Be careful though as these settings are not hard and fast. Changing one control’s setting directly affects the response from other controls. The “Elasticity” control works uniquely as a protection override when starting with the “Extra Small” preset, just as the “Mod 1” control works uniquely as a protected area width control when starting with the “Extra Large” preset, but only because thats what works with that particular combination of settings. As with the original FCP based Elastic Aspect, it’s entirely possible to distort your image quite horribly using a bad combination of settings.
Ok. Thats it from me. Good luck with the plugins, I hope you find them useful.
All the best
Andy.

Download does not work!
Hi Martin
Sorry about that. Please can you try the button again? It seems to work from my end, but just to be sure I’ve adjusted the download link-method so that hopefully it will be more reliable. If it’s still not working at your end then please head over to the Noise Industries “freebies” download page, you can grab them all from there … and many more great plugins besides!
http://www.noiseindustries.com/fxfactory/free/
Cheers
Andy
Pingback: Три бесплатных плагина для FCP7 и FCPX | FeelLab·
Pingback: 3 FREE Plugins for FCPX, Premiere & After Effects | Premiumbeat.com·
Andy I am using FCPX 10.0.8 – the FxFactory page says the Elastic Aspect plugins are “Unsupported”
Bill
Hey Bill
I have FCP X 10.0.8 here too … and so far, fingers crossed, all seems fine at my end.
Would you mind describing exactly how, where and when you get the “unsupported” error message. I’ve not come across this before so I’ll need some background in order to troubleshoot what might be the problem.
Thanks
Andy
Hello Andy, I love the Elastic Aspect, it really helps. I have ADOBE premier, FCP7 and FCPX but when I downloaded the software it was not installed in FCPX. Is there anyway, I can get it to download to FCP7 because this is where my project is located.
Sounds like a corrupted install Roman, might be a good idea try to re-download and install again.
Let me know if you’re still having trouble after that.
Cheers
Andy
Im using FCP7 and would like to us “Elastic Aspect” with it but after downloading the zip file and it having no installation instructions I’m at a loss trying to get it to work (or even show up in FCP7’s effects menu.
Can I use this PlugIn with FCP7 and if so where on earth do I install the downloaded files too !!!
Could you please help me with this as it looks like perfect PlugIn that I need but sadly I can’t figure out how to even install it.
Sounds like you’re missing the runtime engine Frank … this is what you need:
http://www.noiseindustries.com/fxfactory/download/
Pingback: Free Downloads for FCPX | Jonny Elwyn - Film Editor·
how can i install it without the fxfactory software? (i have mac os 10.6 so i cannot install fxfactory…)
Sorry Nicola, this version of the plugin is for FxFactory users. What NLE did you want to use it with?
What about Windows? 😦
Sorry Martin
FxFactory currently relies on a Mac only foundation technology (Quartz Composer) … I’m as hopeful as you are that a broader cross platform solution emerges in the future.
Best
Andy
No problem installing it on FCP 7, but unclear how to use it. The tutorial for Premiere is kind of helpful, but since I don’t know that program or its settings, I don’t know what the equivalent settings/procedure is for FCP 7. I’m trying to make the plug-in work on a 4×3 clip within a 16×9 sequence. Is it as simple as — first — changing the clip’s setting to anamorphic, then add the plug-in?
I was able to install it to FCP7 via FXFactory plug-in but I’m unable to use it with 4:3 clip within 16: sequence. No change can be made. Perhaps there are some specific steps to take first before I can made the adjustments?!
Your help would be greatly appreciated. This is an ideal plug-in for me when I load the clip to YouTube so it wouldn’t show any black on the sides.
Hey Ivan
With my plugin you need to stretch the clip to widescreen before you apply the filter.
In FCP 7 that means you’d need to mark the clip as Anamorphic in the clip’s Item Properties (Cmd 9).
After that, you can use the Elastic Aspect plugin’s controls to adjust exactly how and where the widescreen stretch is applied.
Hope it helps
Andy
Pingback: 4:3 GoPro Footage Explained·
Pingback: 4:3 GoPro Footage Explained·
please make your apps and plug-ins also available for windows … they are only for mac which is not good…
I’ve tried using the classic effect multiple times, however, I keep getting strange black diagonal lines in my video when I export (it also shows up in preview). Any advice?
I’m using Adobe Premiere CS6.
Thanks Travis. Unfortunately I don’t have CS6 to test with … but it “should” work in any host app supported by FxFactory.
I’ll drop a note to the Noise Industries team to see if they are aware of any inconsistencies.
Meanwhile, do all versions do this? Does the “simple” version have the same problem?
Cheers
Andy
Thank you for the reply, Andy.
I have not tried the other versions yet, so I cannot give any feedback on them. What exactly do you mean by “simple” version?
Travis
hey andy! could you do some sort of step by step thingy for a dummie like me? i cant figure out how to get the plugin from fx factory
Hey Jim
Step 1) Do you currently have FxFactory from Noise Industries installed? If “Yes” jump to Step 4)
Step 2) and press the big blue download button
Step 3) Run the downloaded FxFactory installer
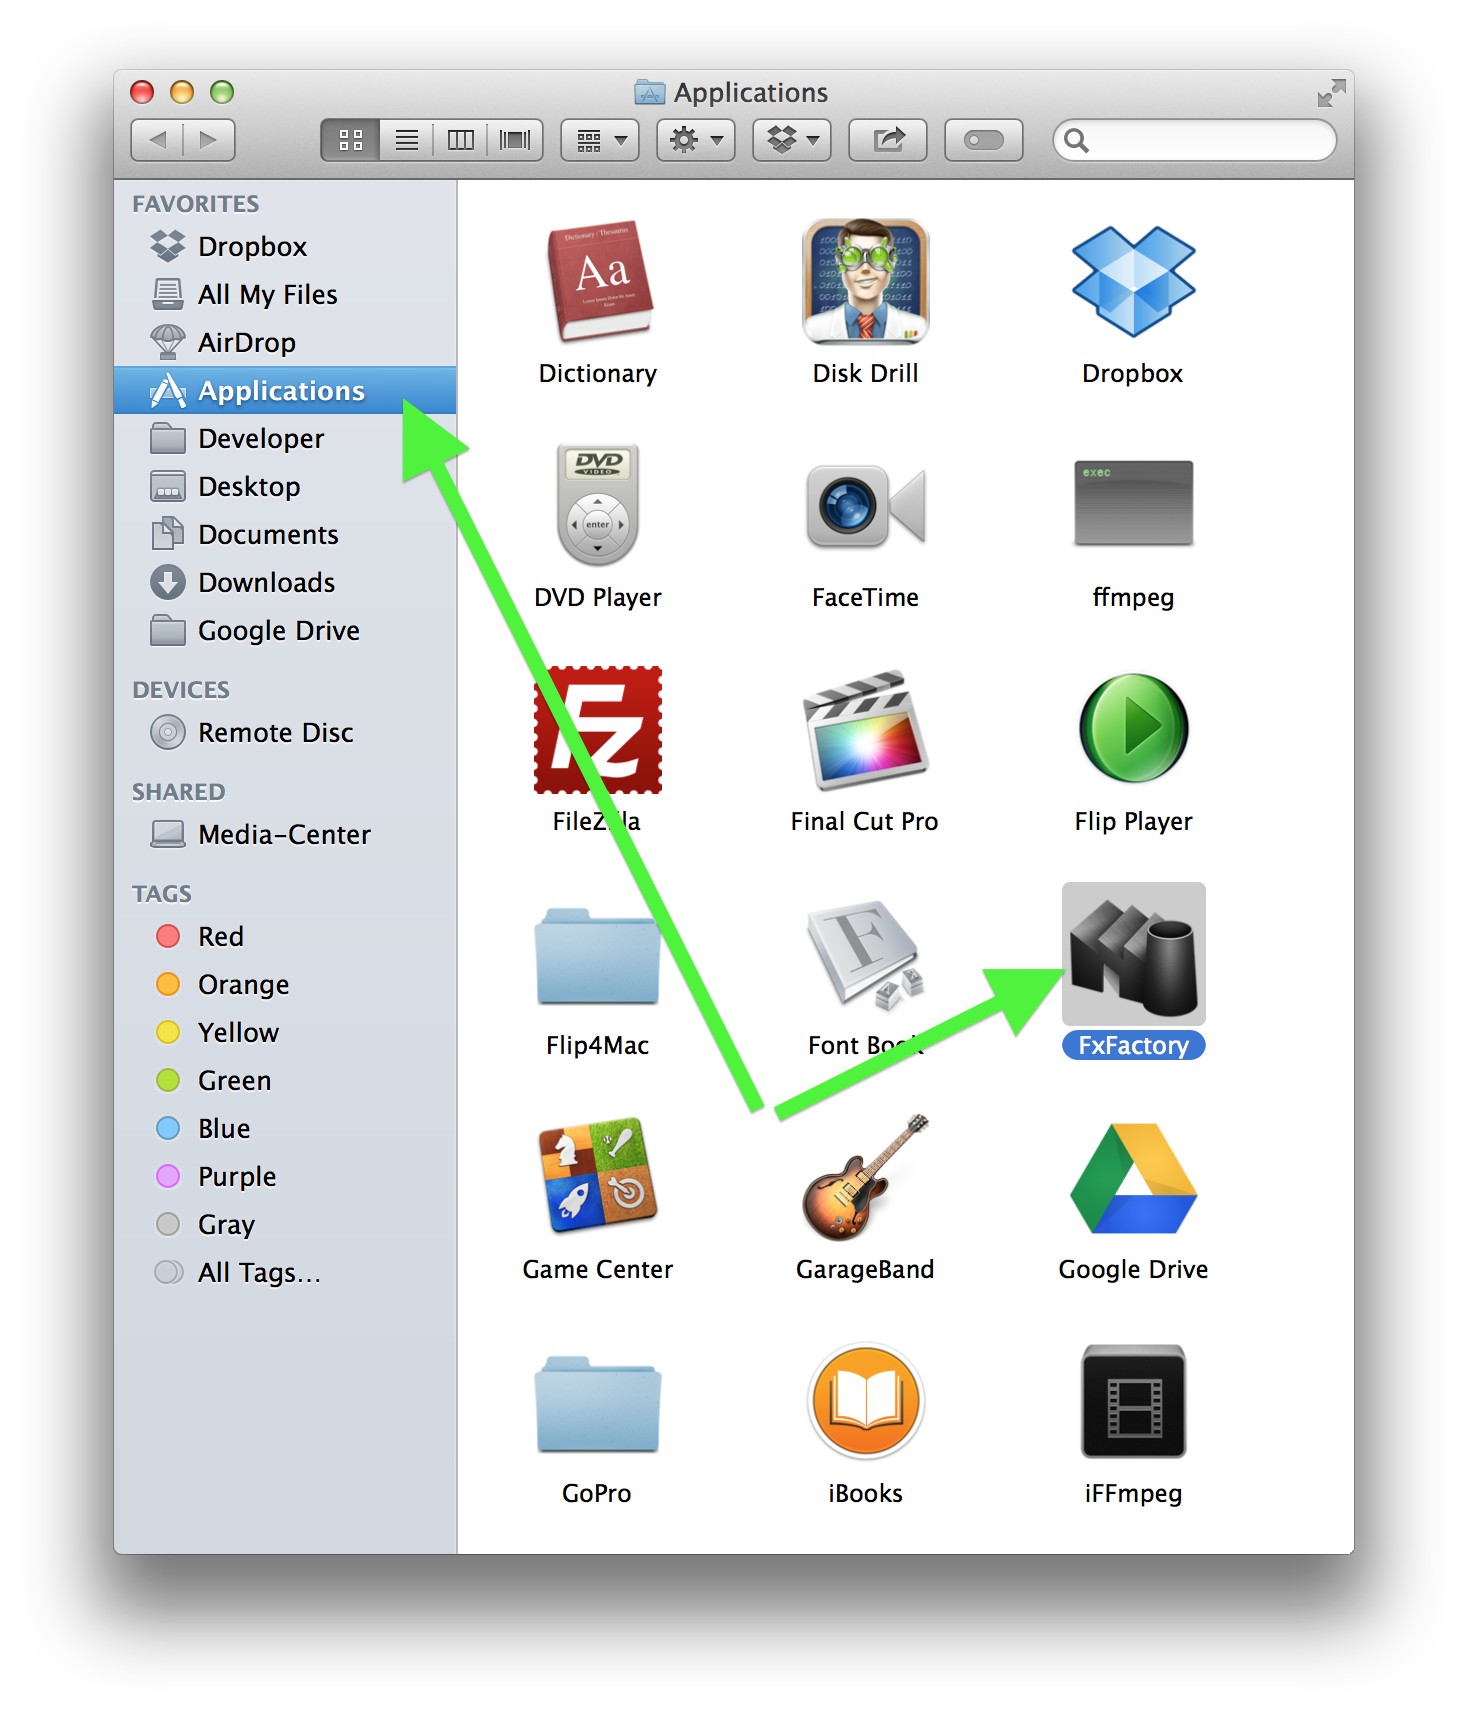
Step 4) Go to your Applications folder and launch the FxFactory application
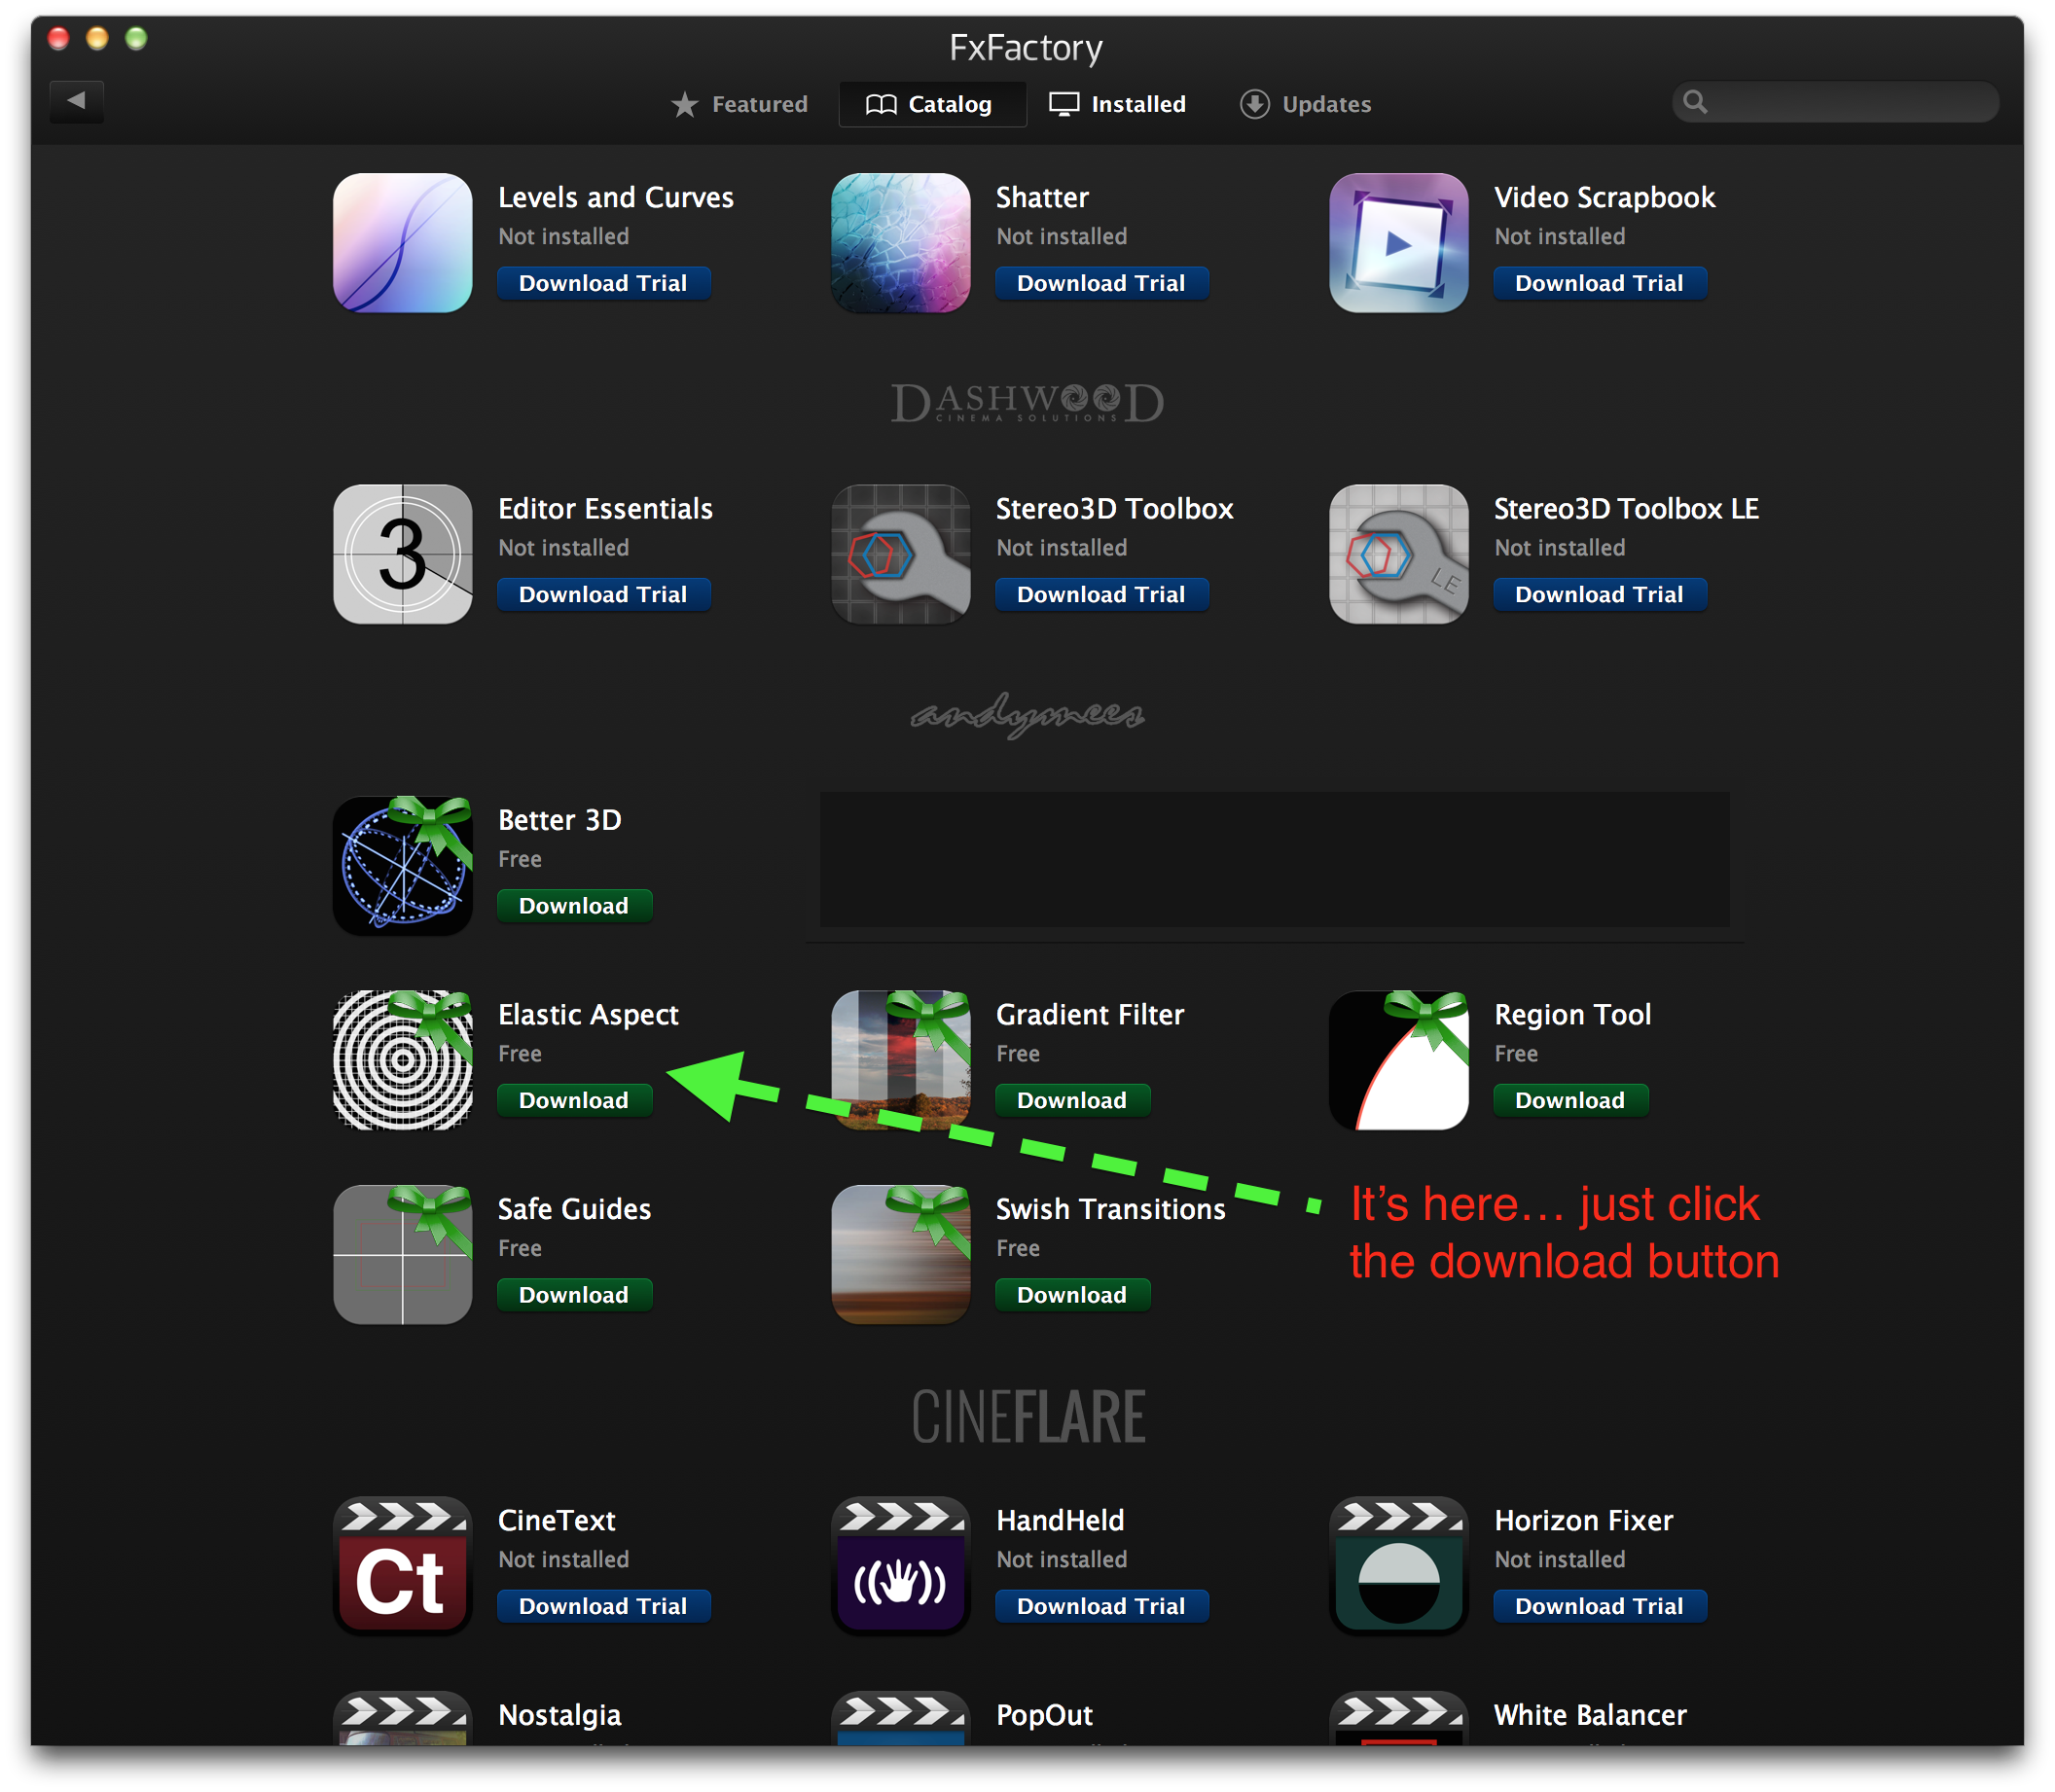
Step 5) Click the “Catlaog” tab, browse through the many magnificent plugins offered …. and eventually you’ll spot my free ones are there too
Step 6) Click the little “Download” button on any plugins you want to install… or you can download mine direct from my pages here and double click the downloaded file to install (into FxFactory)
Should be easy … supposedly
Let me know if that helps
Andy
hey Andy,
its crazy ,i know , but theres no “catalog” tab i can see, certainly no free stuff, what am i doin wrong?
ill pay up to $100 for a hard copy, and whatever for fedex, I’m desperate man! everybody gets it easy, not me tho!
Here are a few quick screenshots that will hopefully help Jim and anyone else in the same boat …
Launch FxFactory…

In FxFactory, make sure you’re looking at the “Catalog” tab


Scroll down until you see my plugins

Does that help?
ok, try not to laugh but I got the plugin (sadly I don’t even know how) FCP keeps telling me on startup how I don’t have said plugin, then the other day I see it in the effects tab, so i’m giddy and I throw it on a clip..
it just blurs everything and has but one tool – radius.
jim-stilldoingeverythingatobtainingandy’splugin-joyce
I need this filter, I think I’ve downloaded it (elasticaspect fx pack) but can’t see it in the fxfactory app. (i have 3.0.4) I would love this filter but wouldn’t want to upgrade from Snow Leopard for a free filter. Is tehre anyway around this? Cna it be made available for earlier versions of fxfactory?
Hej.
I’m trying to use the plugin for Final Cut Pro X. The problem is, when i pres the “fill” buttom, the image gets croped a lot in.
The video is taken by a GoPro Hero 4 black, in 2,7K 4:3 ratio.
Is there any solution to the problem?
Would it be possible to provide me with an old version of Elastic Aspect that will run on Fxfactory 3.0.4 so I can use your plugin on a computer running OSX 10.6 (snow leopard)?
I attempted to install the current version, but all efforts results in Fxfactory 3.0.4 crashing. Thanks
I installed FCP 7 on my new MacBook Pro running Sierra and was hoping to install your plugins, but they seem to only be available for FCPX now. They still work on my iMac running OS 10.7.5. But where are they? Can I transfer them to my new Mac? Is there an old download option somewhere?
Hi Chris
Here’s a link to the old FCP 7 plugins:
https://www.dropbox.com/s/pmg3km9czuizu42/andysplugins.zip?dl=0
Cheers
Andy
Pingback: 10 to Follow: More Great Video Editing and Post-Production Twitter Users·
how to add this plugin to adobe premiere first?!!!!!
Hey Aly
The easiest way to install FxFactory based plugins (like these) is via the FxFactory app. Just switch to their ‘Catalog’ tab and scroll through till you find the plugin you want, then click the download button. Relaunch Premiere and you should find the plugin listed in the Effects panel.
Cheers
Andy
Hi Andy. I’ve got Elastic Aspect for After effects (MAC). Great plug-in! I’ve been using it to convert 1.85 footage to 1.33, mostly by stretching the skies. I’m curious if this actually adds pixels in the process? For example I take a 1920×1080 resolution clip, and stretch it to 1.33 aspect, do i now have a legitimate 1920×1440 clip?. In other words, does the plug-in add information between pixels to cover the stretch, or are individual pixels stretched/enlarged to cover more area?
Thanks!
Tristan
Hey Tristan
The scaling between source and target frame sizes is being handled by the host, so any interpolation of new pixel data is according the host’s scaling settings.
The plugin’s algorithm itself is not adding any new information between pixels, it’s simply redistributing the scaled source pixels horizontally to create the required stretch.
Hope that helps
Cheers
Andy
Hi Andy,
That makes sense. Ok great, thanks for the info and quick reply! Much appreciated.
Tristan
Hi Andy, will you be updating this to work with the M1 Apple Silicon chips? Your plugins, this one in particular, are the ones I miss the most after upgrading to a new MacBook Pro. Pretty please with sugar on top?
Can’t promise anything Rudi, but I’m hoping to have an M1 based laptop to play with some time in the next few months, so will take a look once that happens.
Hi Andy,
I’m running OS Catalina and FCP 10.5. I downloaded Swish Transitions, Region Blur and Elastic Aspect. I’ve decided I don’t need Elastic Aspect and tried to discard it by dragging the folder from my Effects folder on my hard drive to the trash. However, it keeps re-appearing in my Effects folder. How do I uninstall it?
Thanks,
Philip
Hey Philip
As these are FxFactory based effects then I think you probably need to manage them via the FxFactory app. I don’t currently have FxFactory installed so I can’t check for you, but thats where I’d look.
Hope it helps
Andy